One of them is taking a screenshot. In my opinion, this is easily among the most important and frequently used tools on our device. As and when you find interesting content, some funny images, or even just a message, you could easily take a screengrab of that content. Although there exist other methods as well, like saving the image manually to your device, saving the entire webpage for future use, or copy-pasting the text content to any notepad application like Google Keep. However, the thing with all of them is that you require quite a lot of effort. On the other hand, it takes 2 seconds at most to take and save a screenshot in Android. And in this fast-paced world, each second counts.
Also Read: Beginner’s Guide on How to Create a Complete Backup of Android Device
How to Take Screenshot on Android
On that note, let us check out the steps on how to take a screenshot on Android. The below steps are valid across all the Android device, no matter to which manufacturer does it belong. We have shared around three different methods, try the one that suits your need!
Method 1: Universal Method of Taking Screenshot on Android
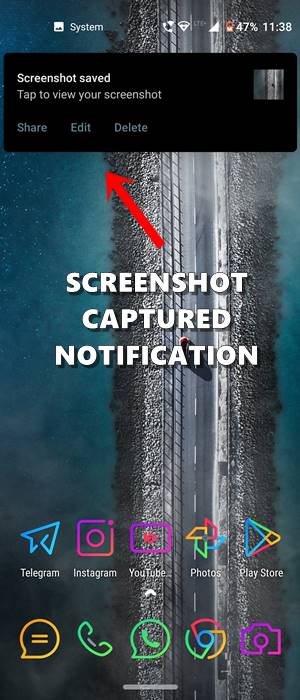
This method will work in near about every Android device. To capture a screenshot this way, you will have to take the help of hardware keys. To be more specific, press and hold the Power and Volume Down button together for a couple of seconds until you see the screenshot is captured message. As soon as it is done, you should also get a notification on your device. Note: Some devices might also use the Home button and Volume Down key for the screenshot.
Most of the manufacturers give three options in that notification: Share, Edit, and Delete. The first option allows you to share the captured screenshot via an app like WhatsApp, Facebook, Instagram, Telegram, etc. The second option gives you some editing capabilities, like doodling on the image, adding text, applying filters or cropping the image. The third and final option deletes the image from your device, forever (though there is a way to recover it, which will be discussed later on).
Check out: How to Send Fake Live Location on WhatsApp
Method 2: Take Screenshot on Android Using In-Device Gestures
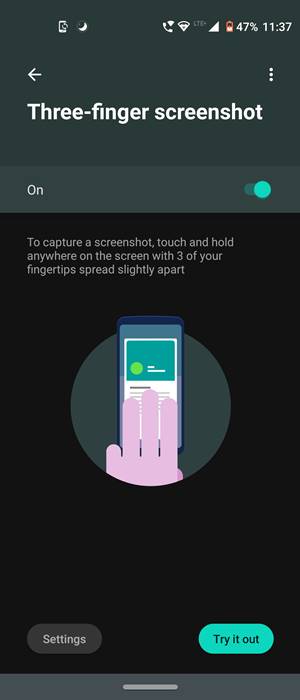
Some devices also provide a few nifty gestures to make you do your work pretty easy and fast. In this regard, now we are increasing the number of devices coming with gestures to take screenshots in Android as well. In most cases, the option should already be enabled by default. If not, head over to Settings > System > Gestures > Look out for the Screenshot option and enable it.
For most devices, you simply have to perform a swipe down gesture using three fingers. In some other devices like Motorola, you might have to tap on one portion of the screen for 3-4 seconds using three fingers, and the screenshot will be taken automatically.
Method 3: Take Screenshot on Android Via Third-Party Apps
We don’t vouch for third-party apps in this regard. There are plenty of reasons for the same.
First off, until you spend a few bucks, these apps will continuously bombard you with ads.They will also take some storage space, although that shouldn’t be much of an issue since most of the device comes with 64 or 128GB storage. But still, why should you populate your device with an app that your device could do it very well.The third and most important reason why we won’t vouch for third party apps is sometimes you might take the screenshot of some personal messages or private photos or even OTP from a bank. So if you do so via Method 1 or 2, it is completely safe since the image is only stored on the device. However, with these third parties, there exists a slight chance that your images might fall in the hands of the wrong person. We aren’t saying that it will surely happen, but why take even a slightest of chance?
Also Read: Use WhatsApp Entirely (Messages, Audio, Video Calls) in Handsfree Mode However, some users still need a third-party app maybe because they need some extra editing capabilities or because they provide some shortcut keys which your device doesn’t. If you also echo their thoughts, then head over to Play Store and download there you could see a plethora of Android screenshot apps. We did a slight digging and turned out the Screenshot Easy App to be the best. It has around 4.4 ratings out of 5 and has been downloaded over 10 Million times. So if you are looking for a third-party app, this might do the needful.
I Accidentally Deleted My Screenshot? How to Recover it?
So if you have accidentally deleted your screenshot, then there’s still a handy workaround through which you could get it back. There are a few prerequisites that need to be made. First of all, you should be using the Google Photos app. And secondly, the backup and sync functionality should be enabled.
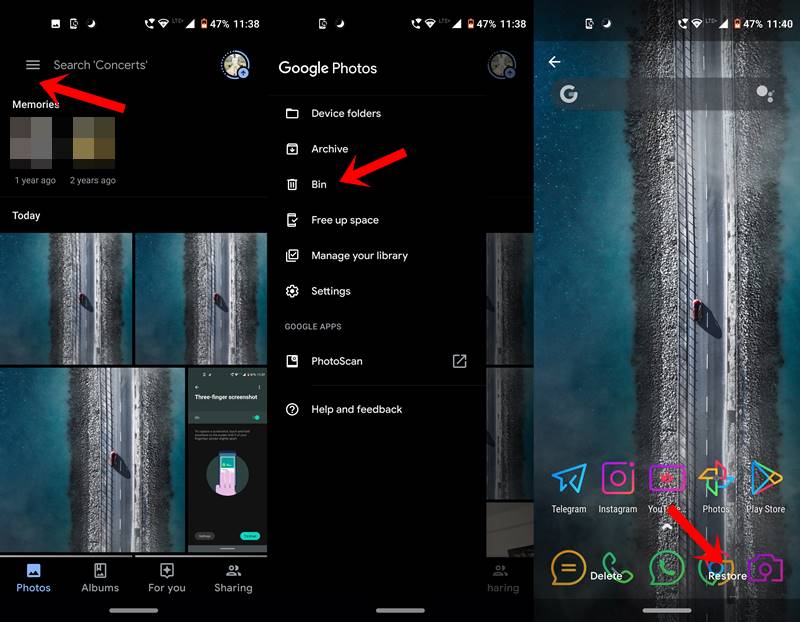
If that’s the case, then any screenshot that you have deleted by mistake could be taken out from Google Photos Bin, granted it has been synced. So once you have deleted a screenshot on Android, head over to the Google Photos app and tap on the hamburger menu (three horizontal lines) situated at the top left. Then select the Bin option and open the desired image that needs to be restored. Finally, hit the Restore option.
Don’t Miss: Improve Battery Backup of OnePlus 6/6T
Conclusion
So with this, we conclude the guide on how to take a screenshot in Android devices. We have shared three different methods for the same. Do let us know in the comments section which one will you ultimately end up choosing. We have also shared a handy method to recover your deleted image. Nowadays all the Pixel and Android One devices have Google Photos preinstalled, and other manufacturers tend to keep it preinstalled as well. Anyways this is the best gallery app, so there’s no reason why you shouldn’t be using it. Signing off, if you have any queries, do drop them in the comments section below, we will be back with a solution ASAP!
Read next: [Android, iOS] This Google App Lets You Earn Free Money! Try It Now
About Chief Editor


